

by Charlie Webb, CPP | May 10, 2018 | Quality Assurance & Manufacturing
The Deburring Process In manufacturing, we usually think of a “burr” as an unwanted piece of material from machining operations, such as grinding, cutting, drilling, milling, or turning. But in my quality vernacular, a “Burr” is any byproduct of an operation that is...
by Charlie Webb, CPP | Apr 5, 2018 | Sterile medical device packaging
Those of us that work in medical device manufacturing and medical device packaging stumble across acronyms daily. If anyone from outside of our Industry would encounter our chatter it may indeed seem like a foreign language. Our esoteric alphabet flows freely IQ, OQ,...by Charlie Webb, CPP | Jun 29, 2014 | Education
Our goal on this page is to provide clarity on many of the industry’s esoteric terms in order to create a more crisp interaction with our customers. The following terms are defined as we see and understand these industrial terms. The term definitions may appear...by Charlie Webb, CPP | Jun 29, 2014 | Education
Medical Packaging 101 Medical packaging is obviously serious business. Even the most efficacious medical device can be rendered dangerous in the presence of surface contaminants. Obviously, devices, particularly implantable devices, are used in a sterile environment...by Charlie Webb, CPP | Jun 29, 2014 | Education
What are bag sealers? The basic function of bag sealers is to apply heat, causing the ends of the product packaging to fuse. These can be combined with vacuums or even an inert gas source for gas flush sealing. Bag sealers are used by manufacturing companies, both...Our blog topics are typically focused on medical device package and manufacturing quality control. We do however go outside these categories for an occasional rant to give our readers a peek into our point of view. If you have a topic that you would like us to touch on drop us a note in the contact us form, thank you for visiting our blog.

Charlie A. Webb, CPP, CKF
Directory of quality,
new product development
Meet our Sig Sigma master black belt, patented inventor and medical device packaging guru, contact Charlie for validation support.

Join the conversation! We are seeking medical device packaging experts to chime in on our blog.
Share your knowledge with our sterile device packaging community. If you are working in our industry and have insight to better ways to package medical devices, we would love to hear from you.
Make our blog better, tell us about the topics you would like us to cover this coming year. This blog is about much more than just medical device packaging, our aim is to cover all issues surrounding medical device packaging and manufacturing. Ahead we will be covering the broader issues for the MDM’s such as the challenges of marketing medical devices in a highly regulated and cost sensitive marketplace. We will also speak on medical device packaging challenges for the engineers that develop the validation plan. To build a better community here we invite you to consider participating in our guest blogger program. You need not be an SME to chime in, just speak your mind with relevant input, drops us a line, we welcome your feedback.
Our calibration may not meet all calibration requirements for critical packaging machines, be sure to evaluate our calibration process by contacting our engineering group at 800-550-3854. Your machine’s calibration status is a matter of record when leaving our laboratory, the data-logging session represents the “as left” condition of your sealer at the time of calibration. It is possible that a mechanical/physical change, i.e. shipping damage, could change your calibration, therefore, we recommend evaluating your machine’s thermal performance when your sealer returns in order to thwart possible seal failures.
Please contact our engineering group for guidance on appropriate protocols and testing equipment to perform a calibration check at 800- 550-3854. Calibration can be altered if certain parts are changed on the sealer, it is recommended that you always check the thermal performance after service or repair of your sealer. Some of the sealers we calibrate have a wide +/- thermal performance range, therefore when developing your packaging validation you should allow for that range in order to understand the sealers’ possible range of performance after calibration. Because many factors can affect the adherence to the calibration range we always recommend checking calibration throughout the year.
Temperature sampled at a single location on the platen at a single set point. A redundant data logging session is performed with a different meter and test lead to verify test accuracy. This includes a certificate, machine affixed sticker with record number, technician’s name, and calibration due date. The line-item data, as well as waveform data, is also included with this calibration package. It is the customer’s responsibility to understand the appropriate calibration needed. We do not assess the value of the “type” of calibration selected to the regulatory process that our customers are bound to.
Temperature sampled at a single location on the platen at a single set point. A redundant data logging session is performed with a different meter and test lead to verify test accuracy. If your machine qualifies, we will also perform a mechanical calibration for force and verification of the timer function. This includes a certificate, machine affixed sticker with record number, technician’s name, and calibration due date. The line-item data, as well as waveform data, is also included with this calibration package. It is the customer’s responsibility to understand the appropriate calibration needed. We do not assess the value of the “type” of calibration selected for the regulatory process that our customers are bound to.
Temperature sampled at a single location on the platen at multiple set points (up to 3 temperatures), i.e. 220-275-350. A redundant data logging session is performed with a different meter and test lead to verify test accuracy. This includes a certificate, machine affixed sticker with record number, and technician’s name, and calibration due date. The line-item data, as well as waveform data, is also included with this calibration package. It is the customer’s responsibility to understand the appropriate calibration needed. We do not assess the value of the “type” of calibration selected for the regulatory process that our customers are bound to.
Temperature sampled at a single location on the platen at multiple set points (up to 3 temperatures), i.e. 220-275-350. A redundant data logging session is performed with a different meter and test lead to verify test accuracy. If your machine qualifies, we will also perform a mechanical calibration for force and verification of the timer function. This includes a certificate, machine affixed sticker with record number, and technician’s name, and calibration due date. The line-item data, as well as waveform data, is also included with this calibration package. It is the customer’s responsibility to understand the appropriate calibration needed. We do not assess the value of the “type” of calibration selected for the regulatory process that our customers are bound to.
Temperature sampled at a single location on the platen at multiple set points (up to 3 temperatures), i.e. 220-275-350. A redundant data logging session is performed with a different meter and test lead to verify test accuracy. If your machine qualifies, we will also perform a mechanical calibration for force and verification of the timer function. This includes a certificate, machine affixed sticker with record number, and technician’s name, and calibration due date. The line-item data, as well as waveform data, is also included with this calibration package. In addition, we will perform an accredited ASTM F88 peel study on thirty samples of your pouch material as well as an accredited ASTM F1929 dye penetration test on material that qualifies. It is the customer’s responsibility to understand the appropriate calibration needed. We do not assess the value of the “type” of calibration selected for the regulatory process that our customers are bound to.
We provide ISO/IEC 17025 accredited calibration services for customers that request this level of service. By requesting ISO/IEC 17025 accredited calibration services, you agree to the following conditions:
If you have questions regarding the scope of this calibration please contact customer service. 800-550-3854
Before returning your packaging equipment for service or calibration, please read the following SRA (Service Return Authorization): Third-party shipping organizations such as UPS and Federal Express are accustomed to moving a variety of packages, but oftentimes they disregard fragile labels. The typical handling with these types of carriers is very rough. Within our own shipping department, we have a dock height drop arbiter to determine how well a machine is packed. In other words, if your product were dropped at the height of a commercial truck dock, it should survive the fall unscathed. In order to achieve this robust packaging, you should not use fillers such as loose-filled Styrofoam, as it allows too much movement within the container during the shipping process.
When preparing your sealing equipment for shipment, you should first secure the sealing jaws by carefully placing a foam rubber or corrugated insert in the jaws in order to prevent the jaws from moving during shipment, which can cause a sealing jaw breakage. After securing the jaw, the sealing equipment should be placed in an oversized plastic bag in order to prevent packaging material and particulates from entering the inside of the machine during the shipping process. The bagged machine should be placed in a heavy, preferably double walled, corrugated box with a minimum of six inches of buffer space between the machine and the box walls. This includes the bottom of the box as well. A foam sheet should be placed on the bottom of the box. The sealing machine should be placed in the center and all sides surrounding the machine should also be buffered with multiple layers of corrugated or foam material. Pay special attention to the jaw ends where the electrodes are located. This process should be repeated at the top of the machine. There should be no air space on any of the sides within the box, so the machine cannot move during shipment.
Also, if you are sending any loose parts with the machine, such as cables, etc. do not place them near the machine as they may rub during shipment causing damage. Do not send the machine table (that the pouch rests on when sealing) as this may rub against the machine and cause damage. If you have any specific requests in terms of how the machine should be calibrated or serviced, or a description of the problems the machine is experiencing, those should be included with the documentation. Also, prominently note any safety concerns or specific hazardous conditions of the sealer under the Additional Comments section of the SRA Number Request Form.
A Maintenance Supervisor’s name and phone number should be included. The machine should be strapped with fiber strapping tape or nylon shipping straps and marked excessively with red fragile labels on every exposed panel of the shipping container. Further, the SRA (Service Return Authorization) number should be prominently marked on the face of the box. Also, it has been our experience even when utilizing extreme caution, machine damage can still occur. Therefore, it is vital that you send the equipment insured for the purchase amount of the unit in order to secure your investment. Van der Stahl Scientific Inc. cannot be responsible for any equipment in transit to our facility for service and repair. Please sign this agreement acknowledging that you understand how the equipment should be prepared for safe transit and fax it back to our customer service line at 866-203-0809. Should you have additional questions regarding this service return authorization, please feel free to contact our customer service agents at 800-550-3854.
This limited service warranty applies solely to equipment serviced or repaired by Van der Stahl Scientific, Inc. (VDS), and does not include transportation, installation, or removal, or re-installation.
Subject to the limitations herein, VDS warrants that the service or repair of new machinery for one (1) year from the date of purchase, will be free from defects in new materials and workmanship. This limited service warranty excludes: (a) damage which occurs in shipment; (b) applications and uses for which machine was not intended; (c) failures or problems which are caused by products or equipment not supplied by VDS; (d) accidents, misuse, abuse, neglect, misapplication, fire, water, lightning or other acts of nature; (e) incorrect electrical line voltage, fluctuations or surges; (f) damage caused by improper or faulty installation, or any act, error, neglect or default of Customer; (g) improper connection with any peripheral; (h) machine alteration or modification; (i) in1proper or unauthorized repair; (j) cosmetic damage to exterior finish; (k) machines with altered serial numbers; (I) failure to follow operating instructions as covered in the manual, including maintenance and calibration guidelines; (m) normal wear to parts such as heating elements, glass cloth, silicone rubber, temperature sensors, shock absorbers; (n) customer adjustments, maintenance and environmental instructions which are covered and prescribed in the product manual. All warranty work will be performed at the VDS facility.
If such VDS product fails to conform to the warranty above, the exclusive remedy of Customer and the sole liability of VDS shall be, at the option of VDS, to replace or repair the affected product, or to refund to Customer the price of the affected products. The availability of replacement products is subject to product discontinuance policies at VDS. Customers may not return products without first obtaining a customer service return authorization (SRA) number from VDS. If VDS elects to repair the affected product, all warranty work performed on our products will be handled by a VDS Service Technician at the VDS service center in southern California and the amount of time it may take on a service will depend on technician availability due to service load. VDS will repair or replace the machine with new or reconditioned parts.
THE WARRANTIES SET FORTH HEREIN ARE EXCLUSIVE AND IN LIEU OF ALL OTHER WARRANTIES, REMEDIES, AND CONDITIONS, WHETHER ORAL OR WRITTEN, EXPRESS OR IMPLIED. VDS DISCLAIMS ALL OTHER WARRANTIES, WHETHER EXPRESS, IMPLIED OR STATUTORY, INCLUDING, WITHOUT LIMITATION, ANY WARRANTY OF MERCHANTABILITY, FITNESS FOR A PARTICULAR PURPOSE, OR NON-INFRINGEMENT, AND ANY WARRANTY THAT MAY ARISE FROM COURSE OF DEALING, COURSE OF PERFORMANCE, OR USAGE OF TRADE. IF VDS CANNOT LAWFULLY DISCLAIM IMPLIED WARRANTIES UNDER THIS LIMITED PRODUCT WARRANTY, ALL SUCH IMPLIED WARRANTIES, INCLUDING WARRANTIES OF MERCHANTABILITY AND FITNESS FOR A PARTICULAR PURPOSE, ARE LIMITED IN DURATION TO THE WARRANTY PERIOD (AS DEFINED ABOVE). YOUR SOLE REMEDY WITH RESPECT TO ANY BREACH OF THE LIMITED PRODUCT WARRANTY SHALL BE THE REPAIR OR REPLACEMENT OF THE DEVICE AS SPECIFIED IN THE LIMITED PRODUCT WARRANTY. VDS IS NOT RESPONSIBLE FOR DIRECT, SPECIAL, INCIDENTAL, OR CONSEQUENTIAL DAMAGES RESULTING FROM ANY BREACH OF WARRANTY OR UNDER ANY OTHER LEGAL THEORY INCLUDING, BUT NOT LIMITED TO, LOST PROFITS, DOWNTIME, GOODWILL, DAMAGE TO, OR REPLACEMENT OF EQUIPMENT AND PROPERTY, AND ANY COSTS OF RECOVERING, REPROGRAMMING, OR REPRODUCING ANY PROGRAM OR DATA STORED IN OR USED WITH A SYSTEM. THIS LIMITED WARRANTY SHALL NOT EXTEND TO ANYONE OTHER THAN THE ORIGINAL PURCHASER OF IS PRODUCT, IS NONTRANSFERABLE, AND STATES YOUR EXCLUSIVE REMEDY.
Some states do not allow the exclusion or limitation of incidental or consequential damages or exclusions or limitations on the duration of implied warranties or conditions, so the above limitations or exclusions may not apply to you. This limited warranty gives you specific legal rights, and you may also have other legal rights, which vary from state to state. VDS makes no claims that our medical device packaging equipment meets the requirements of all medical device manufacturers’ validations. Medical device packaging validation varies greatly depending on the risk policy of the medical device manufacturer as well as the class of medical device. It’s important that our customers understand all of our packaging machine functionality in terms of accuracy of the sealer, machine alarms, as well as other negative machines, attributes that might affect your medical device packaging validation. It is the customer’s responsibility to maintain the equipment in order for the machine to develop expected performance.
Due to the wide range of packaging materials and throughput, it is impossible to develop a generic recommended preventative maintenance plan. It is the customer’s responsibility to develop a preventative maintenance plan based on machine settings and throughput. It is the customer’s responsibility to calibrate the machinery, our firm does not send out reminders or notifications regarding calibration m maintenance. VDS does not perform validations for our customers as it is beyond the scope of our function as a machine provider. The process of medical device packaging validation is complicated and should be performed by quality or manufacturing engineers that understand the installation qualification process before purchasing packaging equipment.
Van der Stahl Scientific, Inc. takes great care in servicing and calibrating your equipment. To be certain all sealers are functioning as expected when performing an onsite service/calibration we will strictly adhere to our Onsite Calibration Protocol. In order to help thwart mechanical issues that may affect calibration accuracy, a machine inspection will be included with most machines prior to calibration. However, we are performing these inspections in only a small fraction of the equipment’s operation life. Therefore, return visits to the facility that we perform the onsite service or calibrations at is not included as part of our service warranty. It is important that someone at your facility inspect the equipment before the service technician leaves your facility, as again the return visit is not covered under the service warranty. We suggest you run a peel study on your pouch and evaluate that the unit is performing as expected before the technician leaves your facility.
To ensure that the technician can perform the service/calibration as efficiently as possible you must provide sufficient space for the equipment and all calibration equipment to be set up. You must also provide sufficient access to power outlets for the equipment and calibration equipment. Our Onsite Calibration Protocol states, “If the location does not allow for the requirements of the Quality Manual, the requirements of the method, and the requirements of the customer to be met then the activity shall be postponed or moved to a different area that is suitable.” In the event that the onsite activity must be postponed the rescheduling and reimbursement of any travel fees shall be the responsibility of the customer. Should you have additional questions regarding our onsite calibration and service please feel free to contact customer service at 800-550-3854
Temperature sampled at a single location on the platen at a single set point. A redundant data logging session is performed with a different meter and test lead to verify test accuracy. This includes a certificate, machine affixed sticker with record number, technicians name, and calibration due date. The line item data, as well as waveform data, is also included with this calibration package. It is the customer’s responsibility to understand the appropriate calibration needed. We do not asses the value of the “type” of calibration selected to the regulatory process that our customers are bound.
Temperature sampled at a single location on the platen at a single set point. A redundant data logging session is performed with a different meter and test lead to verify test accuracy. If your machine qualifies, we will also perform a mechanical calibration for force and verification of the timer function. This includes a certificate, machine affixed sticker with record number, technicians name, and calibration due date. The line item data, as well as waveform data, is also included with this calibration package. It is the customer’s responsibility to understand the appropriate calibration needed. We do not asses the value of the “type” of calibration selected to the regulatory process that our customers are bound.
Temperature sampled at a single location on the platen at multiple set points (up to 3 temperatures), i.e. 220-275-350. A redundant data logging session is performed with a different meter and test lead to verify test accuracy. This includes a certificate, machine affixed sticker with record number, and technicians name, and calibration due date. The line item data, as well as waveform data, is also included with this calibration package. It is the customer’s responsibility to understand the appropriate calibration needed. We do not asses the value of the “type” of calibration selected to the regulatory process that our customers are bound.
Temperature sampled at a single location on the platen at multiple set points (up to 3 temperatures), i.e. 220-275-350. A redundant data logging session is performed with a different meter and test lead to verify test accuracy. If your machine qualifies, we will also perform a mechanical calibration for force and verification of the timer function. This includes a certificate, machine affixed sticker with record number, and technicians name, and calibration due date. The line item data, as well as waveform data, is also included with this calibration package. It is the customer’s responsibility to understand the appropriate calibration needed. We do not asses the value of the “type” of calibration selected to the regulatory process that our customers are bound.
Temperature sampled at a single location on the platen at multiple set points (up to 3 temperatures), i.e. 220-275-350. A redundant data logging session is performed with a different meter and test lead to verify test accuracy. If your machine qualifies, we will also perform a mechanical calibration for force and verification of the timer function. This includes a certificate, machine affixed sticker with record number, and technicians name, and calibration due date. The line item data, as well as waveform data, is also included with this calibration package. In addition, we will perform an accredited ASTM F88 peel study on thirty samples of your pouch material as well as an accredited ASTM F1929 dye penetration test on material that qualifies. It is the customer’s responsibility to understand the appropriate calibration needed. We do not asses the value of the “type” of calibration selected to the regulatory process that our customers are bound.
If you have questions regarding the scope of this calibration please contact customer service. 800-550-3854
This limited service warranty applies solely to equipment serviced or repaired by Van der Stahl Scientific, Inc. (VDS), and does not include transportation, installation, or removal or re-installation.
Subject to the limitations herein, VDS warrants that the service or repair of new machinery for one (1) year from date of purchase, will be free from defects in new materials and workmanship. This limited service warranty excludes: (a) damage which occurs in shipment; (b) applications and uses for which machine was not intended; (c) failures or problems which are caused by products or equipment not supplied by VDS; (d) accidents, misuse, abuse, neglect, misapplication, fire, water, lightning or other acts of nature; (e) incorrect electrical line voltage, fluctuations or surges; (f) damage caused by improper or faulty installation, or any act, error, neglect or default of Customer; (g) improper connection with any peripheral; (h) machine alteration or modification; (i) in1proper or unauthorized repair; (j) cosmetic damage to exterior finish; (k) machines with altered serial numbers; (I) failure to follow operating instructions as covered in the manual, including maintenance and calibration guidelines; (m) normal wear to parts such as heating elements, glass cloth, silicone rubber, temperature sensors, shock absorbers; (n) customer adjustments, maintenance and environmental instructions which are covered and prescribed in the product manual. All warranty work will be performed at VDS facility.
If such VDS product fails to conform to the warranty above, the exclusive remedy of Customer and the sole liability of VDS shall be, at the option of VDS, to replace or repair the affected product, or to refund to Customer the price of the affected products. The availability of replacement products is subject to product discontinuance policies at VDS. Customer may not return products without first obtaining a customer service return authorization (SRA) number from VDS. If VDS elects to repair the affected product, all warranty work performed on our products will be handled by a VDS Service Technician at the VDS service center in southern California and the amount of time it may take on a service will depend on technician availability due to service load. VDS will repair or replace the machine with new or reconditioned parts.
THE WARRANTIES SET FORTH HEREIN ARE EXCLUSIVE AND IN LIEU OF ALL OTHER WARRANTIES, REMEDIES AND CONDITIONS, WHETHER ORAL OR WRITTEN, EXPRESS OR IMPLIED. VDS DISCLAIMS ALL OTHER WARRANTIES, WHETHER EXPRESS, IMPLIED OR STATUTORY, INCLUDING, WITHOUT LIMITATION, ANY WARRANTY OF MERCHANTABILITY, FITNESS FOR A PARTICULAR PURPOSE, OR NON-INFRINGEMENT, AND ANY WARRANTY THAT MAY ARISE FROM COURSE OF DEALING, COURSE OF PERFORMANCE, OR USAGE OF TRADE. IF VDS CANNOT LAWFULLY DISCLAIM IMPLIED WARRANTIES UNDER THIS LIMITED PRODUCT WARRANTY, ALL SUCH IMPLIED WARRANTIES, INCLUDING WARRANTIES OF MERCHANTABILITY AND FITNESS FOR A PARTICULAR PURPOSE, ARE LIMITED IN DURATION TO THE WARRANTY PERIOD (AS DEFINED ABOVE). YOUR SOLE REMEDY WITH RESPECT TO ANY BREACH OF THE LIMITED PRODUCT WARRANTY SHALL BE THE REPAIR OR REPLACEMENT OF THE DEVICE AS SPECIFIED IN THE LIMITED PRODUCT WARRANTY. VDS IS NOT RESPONSIBLE FOR DIRECT, SPECIAL, INCIDENTAL, OR CONSEQUENTIAL DAMAGES RESULTING FROM ANY BREACH OF WARRANTY OR UNDER ANY OTHER LEGAL THEORY INCLUDING, BUT NOT LIMITED TO, LOST PROFITS, DOWNTIME, GOODWILL, DAMAGE TO OR REPLACEMENT OF EQUIPMENT AND PROPERTY, AND ANY COSTS OF RECOVERING, REPROGRAMMING, OR REPRODUCING ANY PROGRAM OR DATA STORED IN OR USED WITH A SYSTEM. THIS LIMITED WARRANTY SHALL NOT EXTEND TO ANYONE OTHER THAN THE ORIGINAL PURCHASER OF IS PRODUCT, IS NONTRANSFERABLE AND STATES YOUR EXCLUSIVE REMEDY.
Some states do not allow the exclusion or limitation of incidental or consequential damages or exclusions or limitations on the duration of implied warranties or conditions, so the above limitations or exclusions may not apply to you. This limited warranty gives you specific legal rights, and you may also have other legal rights, which vary from state to state. VDS makes no claims that our medical device packaging equipment meets the requirements of all medical device manufacturers’ validations. Medical device packaging validation varies greatly depending on the risk policy of the medical device manufacturer as well as the class of medical device. It’s important that our customers understand all of our packaging machine functionality in terms of accuracy of the sealer, machine alarms, as well as other negative machines, attributes that might affect your medical device packaging validation. It is the customer’s responsibility to maintain the equipment in order for the machine to develop expected performance.
Due to the wide range of packaging materials and throughput, it is impossible to develop a generic recommended preventative maintenance plan. It is the customer’s responsibility to develop a preventative maintenance plan based on machine settings and throughput. It is the customer’s responsibility to calibrate the machinery, our firm does not send out reminders or notifications regarding calibration m maintenance. VDS does not perform validations for our customers as it is beyond the scope of our function as machine provider. The process of medical device packaging validation is complicated and should be performed by quality or manufacturing engineers that understand the installation qualification process before purchasing packaging equipment.
We’ve received your submission and will be in touch soon.
Please carefully read and agree to the test methods that we utilize for medical pouch testing. It is important to remember that we do not interpret the data as to its value to your process as this function should be determined by your quality team against your packaging validation plan. Again it is vital that you read and understand the limits of our medical pouch study and to make sure that our procedures meet your regulatory and internal quality requirements. Please note that these factors may not all be applicable to your particular material.
We only provide raw data to be analyzed by your quality team
Any special requirements must be in writing on our submission form
We cannot perform any test procedures that falls outside our scope of accreditation
We do not perform statistical analysis of your study
We do not perform DOE’s (design of experiments)
1. Ensure that the number of samples that you are sending is sufficient to perform the tests. Remember that some of the material may be sacrificed during the process of determining the upper and lower limits of the material.
2. For every different type of material, or different size of pouch, an individual form must be filled out with the required information so that the test report can be completed properly.
3. Our test method is the following method as stated in the ASTM F88/F88M-15:
4.2.1 Technique A: Unsupported — Each tail of the specimen is secured in opposing grips and the seal remains unsupported while the test is being conducted.
4. Seal your pouch samples or gather samples from production that you wish to have evaluated. Be sure to note the sealing machines serial number that created the samples. If you require pouch normalization periods longer than our standard 48 hours, please indicate your normalization dwell preferences.
5. Provide us with adequate seal samples (35 for our standard test program) as well as additional buffer samples. If you are sending samples sealed at various times and temperatures settings, please mark specimens individually to thwart confusion. Please indicate any special conditions on this form.
6. Be sure to read our peel study SOP and disclaimer to be certain that our testing methodologies are in sync with your regulatory and internal requirements. Send in sturdy box to our Laboratory.
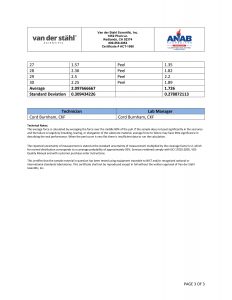
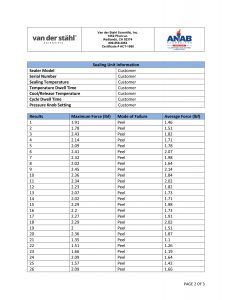
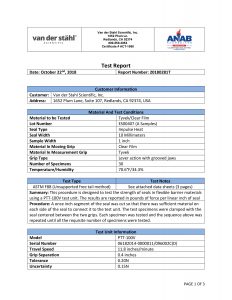
This test method covers the measurement of seal strength in flexible barrier material, in this case medical device pouches (F88 1.1). This test method measures the force required to separate one side of a fin type seal from the other and also identifies the method of seal failure (F88 1.4).
Significance and Use: In accordance with section four of the ASTM F88/F88M:
The measurement of seal strength is important not only in determining opening force but also determining the ability of the process to produce consistent seals (F88 4.1). While measuring the opening force is important there are times when the force may need to be lessened to facilitate opening (F88 4.1). Besides maximum force the average force to open the seal may be useful for some applications and in those cases should be reported (F88 4.1.1). Because some of the force measured may be caused by other influences beside seal strength it is important to use only one technique throughout a set of tests (F88 4.2). We have standardized our usage to the following: Technique A: Unsupported—Each tail of the specimen is secured in opposing grips and the seal remains unsupported while the test is being conducted (F88 4.2.1).
Apparatus: In accordance with section six of the ASTM F88/F88M:
We use a PTT-100V test unit that has a system for measuring the force required to separate the sample and the rate of jaw separation, these systems are accurate to +/-2% (F88 6.1) This sealer utilizes a constant rate of separation that is adjustable from 200 – 300 mm/min and has lever action grooved jaws to prevent slippage of the specimen during testing (F88 6.1).
We use either an SPC-1 or SPC-2 specimen cutter to create a sample with a size of 1.00 in. [25.4 mm] in width within a tolerance of +/-0.5 % (F88 6.2, Test Methods D882: 5.4).
Sampling:
In accordance with section seven of the ASTM F88/F88M the sample population should be of sufficient size to determine overall performance of the seal and sealing system (F88 7.1). Indiscriminate removal of samples with defects may bias the results and should be considered carefully depending on the purpose of the investigation (F88 7.2).
Aging and Conditioning:
In accordance with section eight of the ASTM F88/F88M a minimum of forty hours shall be allowed for conditioning of any samples received, unless otherwise requested by the customer or if other information shows that seal strength stability is reached in a shorter time (F88 8.1, 8.2). The conditioning period may be shortened if necessary to meet certain test objectives, such as the testing of seal strength after a specific period of storage (F88 8.3).
Procedure: In accordance with section nine of the ASTM F88/F88M:
The test unit is calibrated per the manufacturer’s specification (F88 9.1). The specimens are cut to size following the guidelines in section 9.2, making allowances where it is permitted due to smaller grip separation (F88 9.2). Ensuring that only Technique A: Unsupported is used to minimize variance, each leg of the specimen is fixed into the grips with the sealed area being placed an equal distance between the grips (F88 9.3). Center the specimen in the grips, aligned so the seal line is perpendicular to the direction of pull, making sure no stress is put on the specimen prior to the test (F88 9.4). Please note on the test report the orientation of the fin seal as a significant difference has been measured based upon orientation (F88 9.5) If the specimen peels apart in the seal area, either by adhesive failure, cohesive failure, or delamination, the average peel force is measured by the testing machine as a part of the test cycle (F88 9.8, 9.8.1). If the specimen does not peel significantly in the seal area and failure is largely by breaking, tearing, or elongation of the substrate material, average force to failure may have little significance in describing seal performance (F88 9.8.2).
Recent Comments